
Teams camera or microphone not working
- Check the physical shutter and the mute key
- Make sure Teams is pointed at the right device
- The audio choice on the join screen
- Changing devices while you're in a meeting
- Close whatever else is using the camera
- Check the Windows privacy switches
- Camera
- Microphone
- Check the Windows sound device
- Restart Teams, then restart the computer
- If none of that worked
The meeting starts in two minutes, you join, and your face is a black rectangle — or four people are typing "we can't hear you" into the chat. It's a horrible little moment, and it happens to everyone. The reassuring part: this is almost never broken hardware. In the overwhelming majority of cases it's a shutter that's closed, a mute key that got pressed, or Teams quietly pointing at the wrong device.
Try these in order
They're arranged fastest and most likely first, so stop as soon as it works. The first two fix most of these.
- Check the camera shutter and the mic mute key (5 seconds)
- Pick the right camera, mic and speaker in Teams, then make a test call (about a minute)
- Video still black? Close other apps using the camera
- Check the Windows privacy switches
- Can't hear them, or sound comes from the laptop speakers? Check the Windows sound device
- Restart Teams, then the computer
Still not working? Submit a support ticket and we'll take it from there.
Check the physical shutter and the mute key
This is first because it costs five seconds and it's the single most common cause. Many business laptops have a hardware control that switches the camera or microphone off completely — and when the camera is switched off this way, Windows may not even recognize that a camera is installed, or it may show a camera icon with a line through it. No amount of clicking inside Teams will help until it's switched back on.
Look for any of these:
- A key on the keyboard that you press together with the Fn key
- A dedicated camera key on the keyboard
- A sliding switch on the side of the laptop
- A small shutter slider built into the camera itself, just above the screen
Which of these your laptop has, and where it lives, depends on the manufacturer. As one common example, many Dell Latitude and Precision laptops mute the microphone with Fn + F4, and a small light on that key comes on while the mic is muted; on some Latitude models F9 opens and closes the camera shutter. Dell notes that there are exceptions even within those ranges, so treat that as an example rather than a rule — the little icons printed on the keys are a more reliable guide than the key numbers.
If you use a separate webcam or headset, check the obvious physical things too: many headsets have their own mute button on the cable or earcup, and a USB device that's half-seated in the port behaves exactly like a broken one. If everything runs through a docking station, see docking station troubleshooting — a dock that has dropped its connection takes the webcam and headset down with it.
Make sure Teams is pointed at the right device
Teams remembers the device it was last told to use. Plug in a new headset, undock, or join from a different desk, and Teams can end up talking to a microphone that isn't near your mouth or a camera that is no longer plugged in. This is the check that catches most of the rest.
- In Teams, select Settings and more — the ... button at the top right of the Teams window (1).
- Choose Settings, then Devices (2).
- Under Audio settings, set Speaker and Microphone to the headset or device you're actually wearing (3).
- Under Video settings, set Camera to the camera you want to use (4). A live preview appears underneath, so you'll know immediately whether it's working.
- Back under Audio settings, select Make a test call (5). This exercises your microphone, speaker, and camera together and plays your voice back to you.
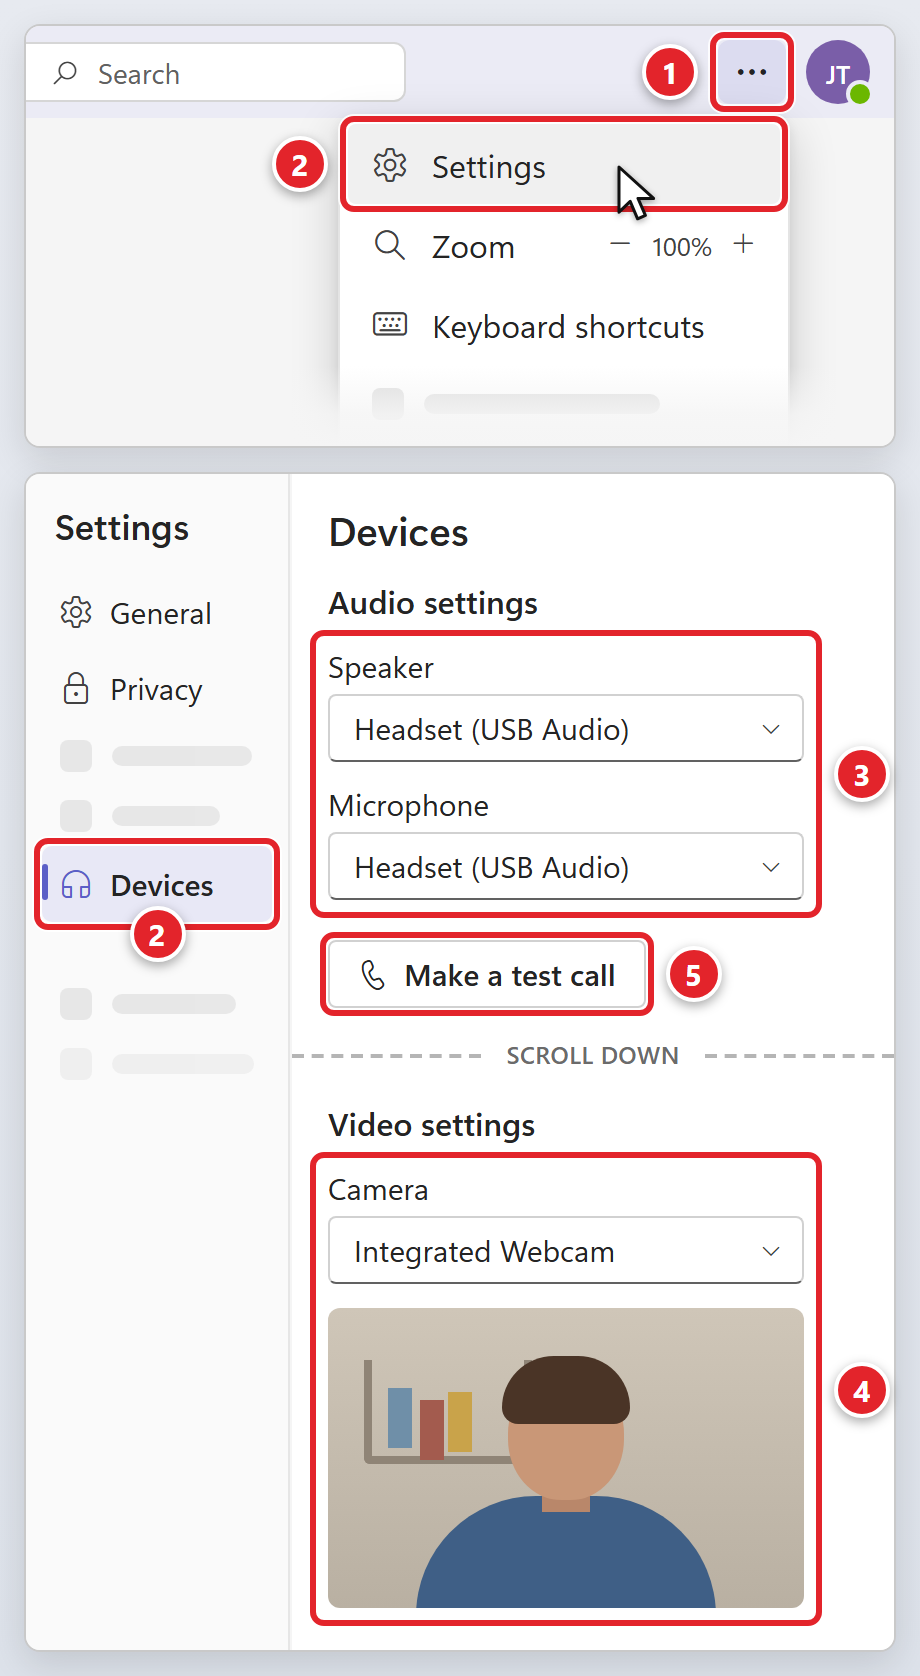
The test call is the most useful thirty seconds in this whole article. It tells you in one go whether the problem is Teams, the device, or something outside Teams entirely — and it does it without an audience.
The audio choice on the join screen
Before you join a meeting, Teams offers Computer audio, Phone audio, Room audio, and Don't use audio. If Don't use audio gets selected by accident, you won't be able to hear anyone and nobody will hear you — and everything inside the meeting will look perfectly normal. For a standard headset-at-your-desk meeting, you want Computer audio.
It's worth glancing at this screen every time, because Teams also remembers whether you had your microphone on or off here and carries that preference into future meetings.
Changing devices while you're in a meeting
You don't have to leave and rejoin. In the meeting controls:
- For sound, select the dropdown arrow next to Mic, then More audio settings. Your speaker and microphone dropdowns are there, along with Noise suppression and Automatically adjust mic sensitivity.
- For video, select the dropdown arrow next to Camera.
And the obvious one that catches all of us at least once a year: check you aren't simply muted. If the control reads Unmute mic, that's your answer.
Close whatever else is using the camera
If your self-preview is a black rectangle even though the shutter is open and the right camera is selected, another application is very likely holding onto it. Some apps take an exclusive hold on the camera while they're open, which leaves nothing for Teams; others are happy to share. Whether two apps can use one camera at the same time depends entirely on how each app asks for it, which is why this problem seems to come and go at random.
The usual suspects are other meeting apps left running from earlier in the day, the Windows Camera app, and browser tabs that have used your camera. Close them completely — not just minimized — then in Teams turn the camera off and back on again.
Windows uses error code 0xA00F4243 for exactly this situation, so if you see that code anywhere, another app is the culprit. If you can't work out which one, restarting the computer clears every hold at once.
Check the Windows privacy switches
Windows has its own permission switches that sit above Teams. If one of them is off, Teams will look like it's misbehaving when in fact Windows is refusing to hand over the device. There are a few layers to each page, so it's worth reading them rather than just clicking.
Each page has switches at the top that govern the whole computer, then a list of individual apps, and then a separate switch for desktop apps underneath that list. If you see an entry for Teams in the app list, turn it on. It may not be there — Microsoft classes Teams as a desktop app, and desktop apps share the single "Let desktop apps access..." switch rather than each getting their own. Either way, leave that switch on, because it is the one Microsoft's own guidance points at.
Camera
Go to Start → Settings → Privacy & security → Camera, and turn all of these on, in this order:
- Camera access (1)
- Let apps access your camera (2)
- The Teams entry in the list of apps beneath it, if one is shown (3)
- Let desktop apps access your camera (4), further down the page
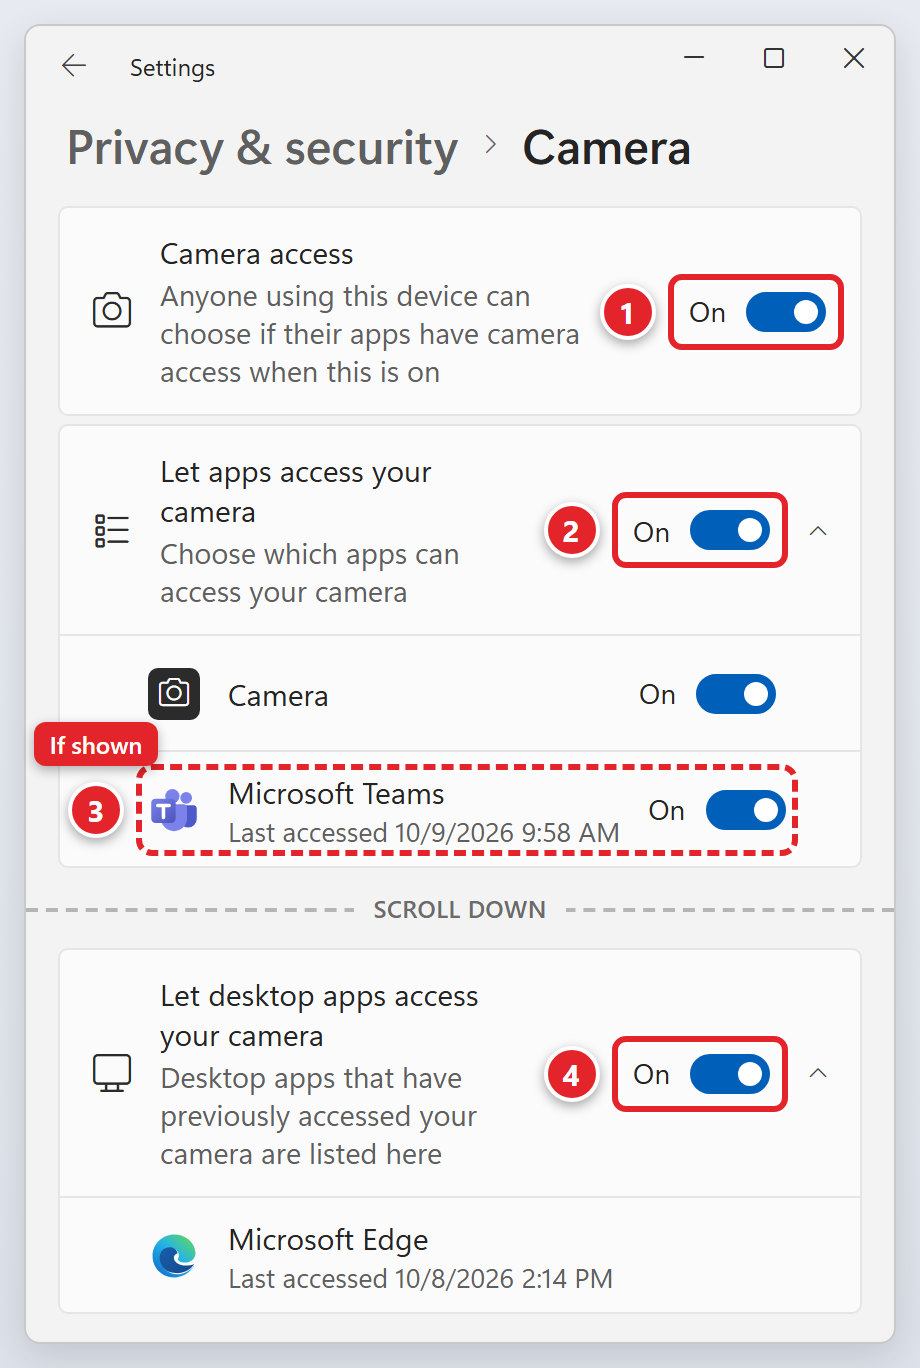
The Microphone page is laid out the same way, with the same four switches.
Microphone
Go to Start → Settings → Privacy & security → Microphone, and turn all of these on:
- Microphone access
- Let apps access your microphone
- The Teams entry in the list of apps beneath it, if one is shown
- Let desktop apps access your microphone
Check the Windows sound device
If people can hear you but you can't hear them, or the sound is coming out of the laptop speakers while you're wearing a headset, the problem is Windows' default device rather than Teams.
Go to Start → Settings → System → Sound. In the Output section, select your headset or speakers — selecting a device here also makes it the default. Then under Input, look for Choose a device for speaking or recording and select the right microphone. There's a microphone test on the same page: select Start test, talk normally for a few seconds, then Stop test to see whether Windows heard you at all.
Less common sound problems. Click one to expand it.
A device you expect to see isn't listed
If a device you expect to see isn't listed, it may be switched off in Windows. Go to Sound → Advanced → More sound settings, find the device on the Playback or Recording tab, open its Properties, and check that Use this device (enable) is selected next to Device usage.
A word about Bluetooth headsets: calls sound muffled
If you use a Bluetooth headset, you may notice that music sounds rich and clear, but the moment a call starts everything goes mono and slightly muffled. On older Bluetooth headsets that's expected behavior rather than a fault, and no setting changes it. Those headsets use one mode for high-quality listening and a different, much narrower mode when the microphone is live, and Windows switches over automatically as soon as any app opens the microphone — so you get a working mic or full-quality audio, but not both at once.
Newer hardware can manage both. Windows 11 supports Bluetooth LE Audio, a newer standard using a codec called LC3, which keeps playback sounding good while the microphone is in use. Whether you actually get it depends on both ends: your laptop's Bluetooth has to support LE Audio and so does the headset. Much of the business hardware sold from late 2025 onward does, but plenty of perfectly good headsets still in daily use do not.
If call quality on Bluetooth is a recurring frustration and your headset is one of the older ones, a USB or 3.5 mm headset is a reliable fallback — those have no mode switching at all and sound the same throughout a call. If you're not sure which category your headset and laptop fall into, or you'd like a recommendation either way, submit a support request and we'll check for you and suggest something that suits how you work.
When another app silences Teams audio
Occasionally a different application will take exclusive control of your headset and mute everything else, Teams included. You can turn that behavior off for a specific device: Sound → Advanced → More sound settings, then on the Playback or Recording tab select the device, open Properties, go to the Advanced tab, and clear Allow applications to take exclusive control of this device. It's on by default, and it's worth doing on both the playback and the recording entry for the same headset.
Restart Teams, then restart the computer
If you've reached this point, restart in two stages. First close Teams completely and reopen it — closing the window often just minimizes it to the system tray, so check there and close it properly from the tray icon. Teams grabs your camera and microphone when it starts, so a genuine restart makes it ask for them again from scratch.
If that doesn't do it, restart the computer. This releases every hold any app had on the camera and microphone, and it re-initializes the devices themselves — which is why it fixes device problems that nothing else touches, particularly after a Windows update or a long stretch of the laptop being suspended rather than shut down. See rebooting and restarting your computer if you want the difference between a restart and a shutdown explained.
If none of that worked
Submit a support request or email [email protected], and we'll take it from there. Some of these genuinely do need administrator access — a driver, a firmware setting, or a locked privacy switch — and those aren't things you can or should be fixing yourself on a managed computer.
To get it resolved in one exchange rather than three, include as much of this as you can:
- What exactly is failing — camera, microphone, speakers, or a combination. "Nobody can hear me but I can hear them" and "my video is black" lead to completely different fixes.
- Whether it's only Teams, or other apps too. The Start test button in Settings → System → Sound is a quick way to tell us whether Windows itself can hear your microphone.
- Your computer's name or service tag, so we know we're looking at the right machine.
- What the hardware is — built-in camera and mic, a USB headset, a Bluetooth headset, a separate webcam — and whether any of it runs through a docking station.
- Any error message or error code, word for word. A photo of the screen works just as well if that's quicker than typing it out.
- Whether any of the privacy switches were grayed out, and which ones. This one tells us immediately that it needs an administrator.
- When it started, and what changed just before — a new headset, a new desk, a docking station swap, a restart, a Windows update.
- Which steps above you already tried, so we don't ask you to repeat them.
- Your next meeting time, if one is coming up. If it's urgent, say so plainly at the top and we'll treat it that way.