
Microsoft 365 - Signing In for the First Time & Setting Up MFA (Step-by-Step with Pictures)
Welcome! This guide walks you through two things, in order: signing in to your new Microsoft 365 email account for the first time, and connecting your phone so it can confirm it's really you (this is called multi-factor authentication, or MFA). Every step has a picture. Take your time and don't skip ahead. Most people finish in about 15 minutes.
Before You Start: What You'll Need
- Your new email address and temporary password. These came from your manager or from us. Have them written down or on the screen in front of you.
- Your mobile phone (iPhone or Android), charged and with you. You'll install one free app on it.
- A computer with an internet connection and a web browser (Microsoft Edge, Google Chrome, or Safari are all fine).
- About 15 minutes without interruptions.
Part 1 — Install the Microsoft Authenticator App on Your Phone
Do this part first, on your phone, before you touch the computer. It makes the later steps go smoothly.
Step 1. On your phone, open the app store: the App Store on an iPhone, or Google Play (the Play Store) on an Android phone.
Step 2. Tap the search box and type Microsoft Authenticator.
Step 3. Find the app called Microsoft Authenticator made by Microsoft Corporation. Its icon is a blue square with a white padlock. Tap Get (iPhone) or Install (Android).
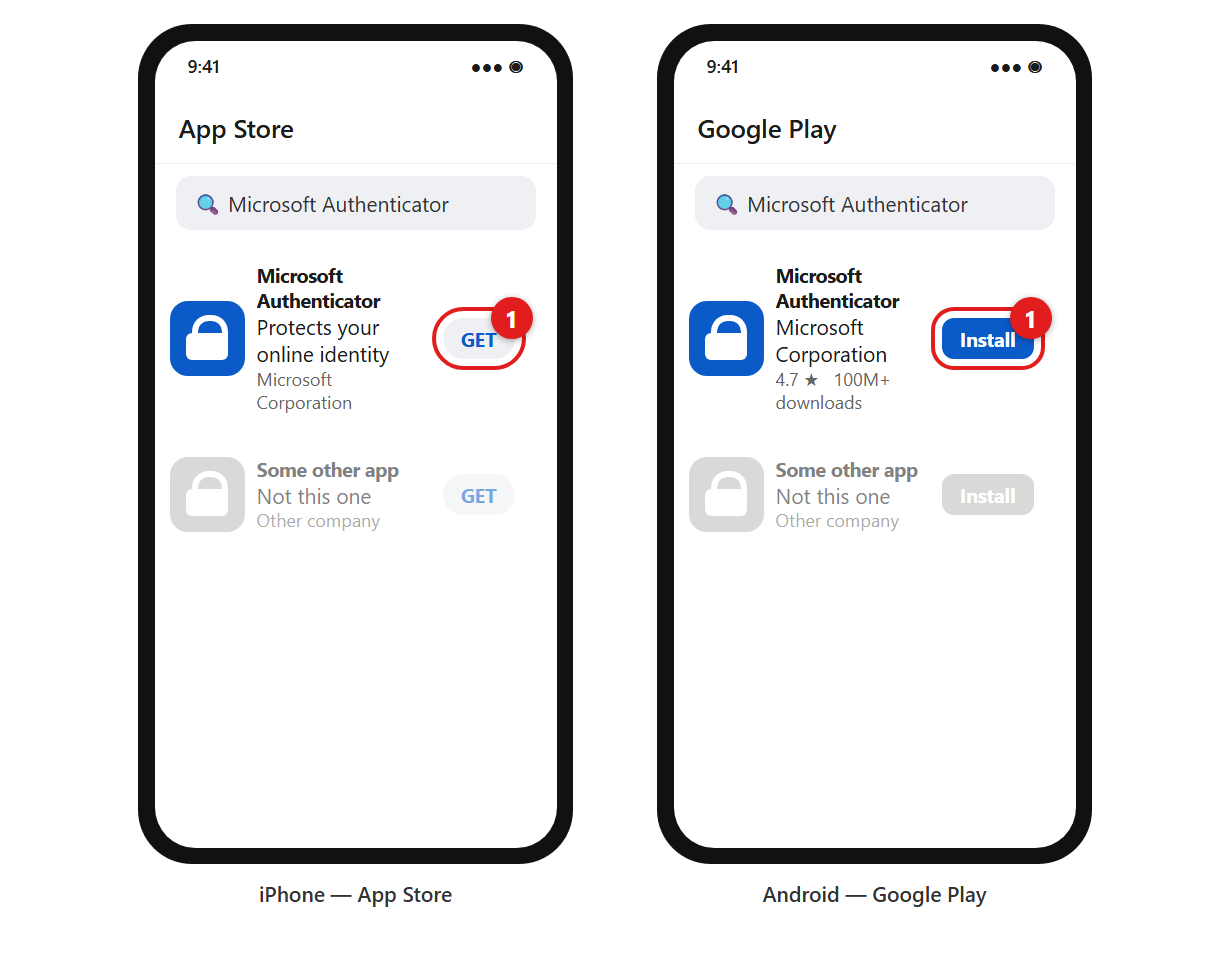
Step 4. Wait for the install to finish. You don't need to open the app yet. The computer will tell you when it's time.
Part 2 — Sign In on Your Computer for the First Time
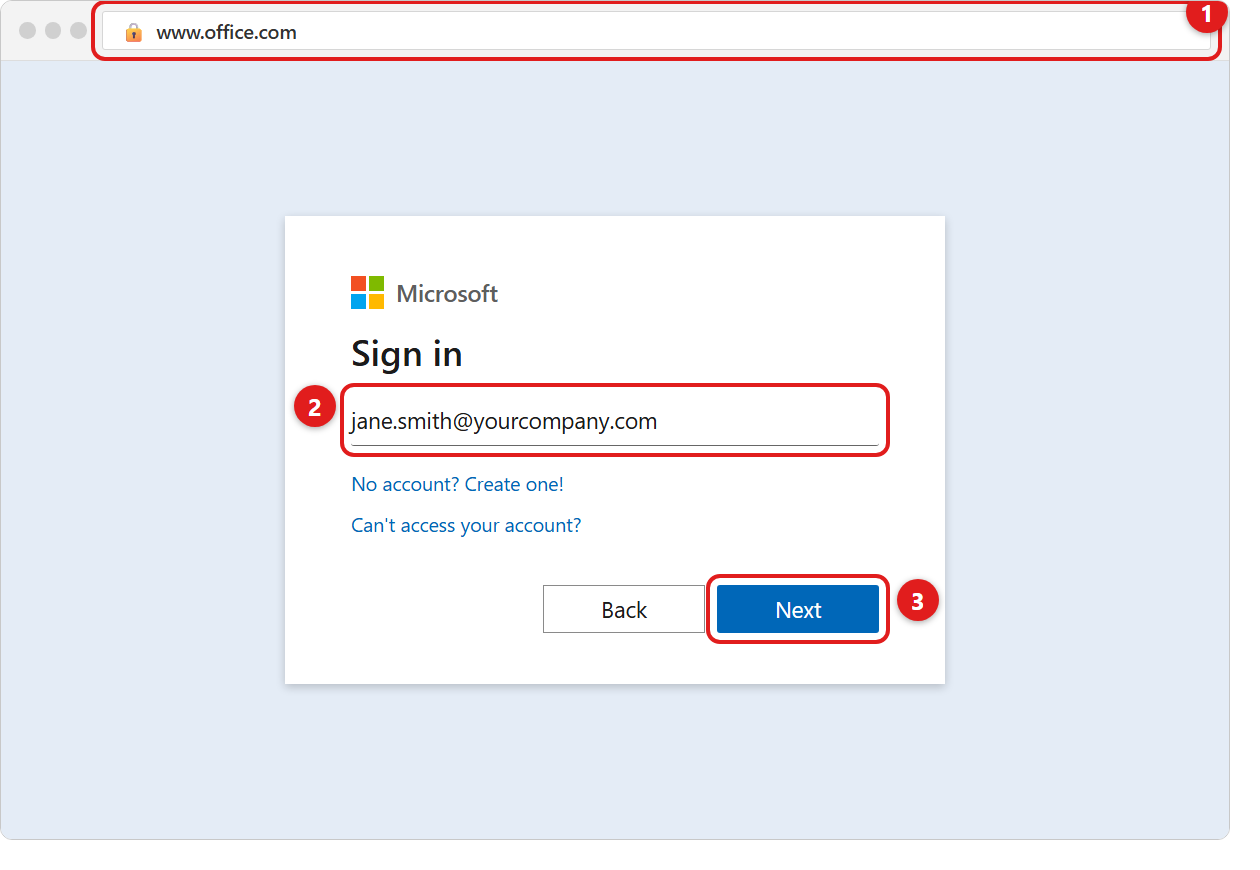
Step 1. On the computer, open your web browser. Click in the address bar at the very top of the window (not a search box in the middle of the page), type office.com, and press Enter on the keyboard.
Step 2. Click Sign in. A box like the one below appears. Type your full new email address, then click Next.
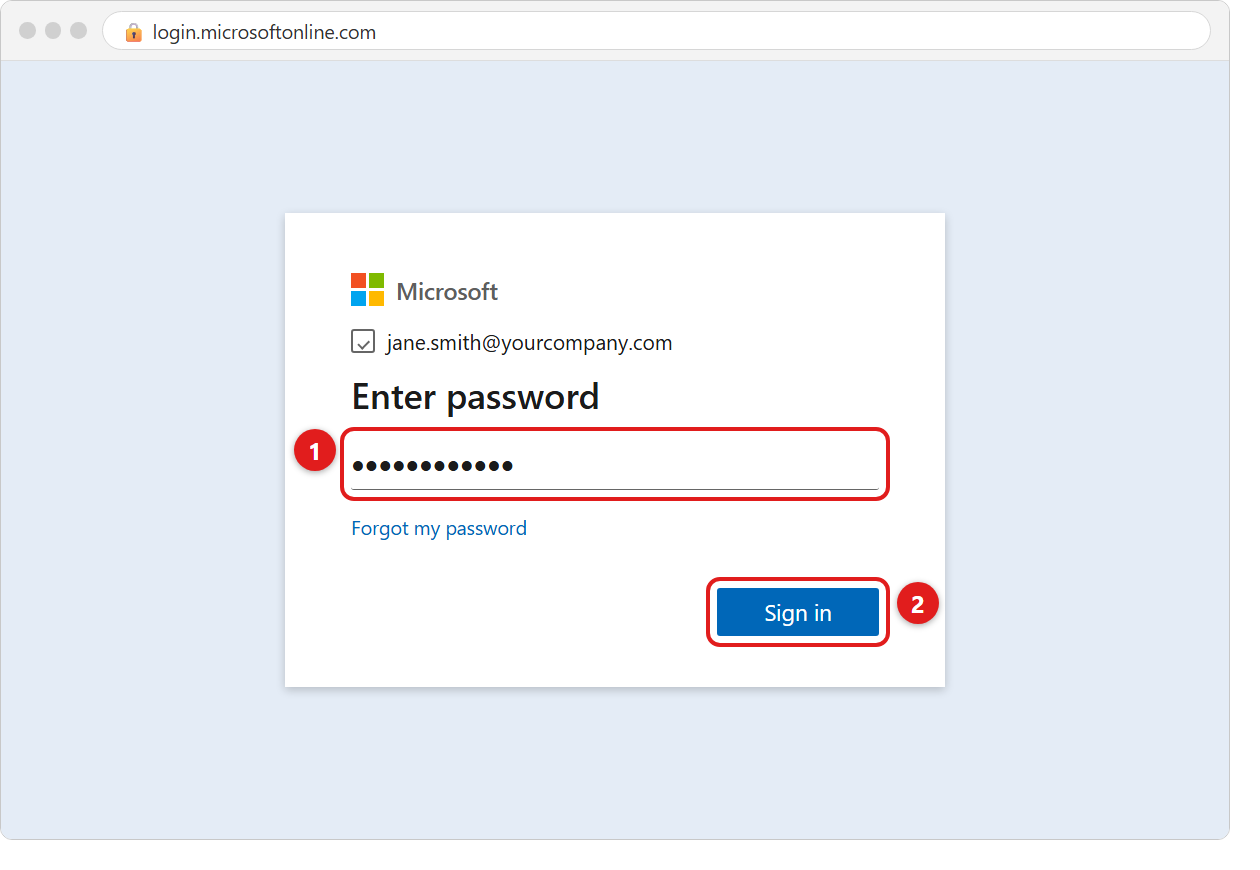
Step 3. Type the temporary password you were given, exactly as it was written, then click Sign in.
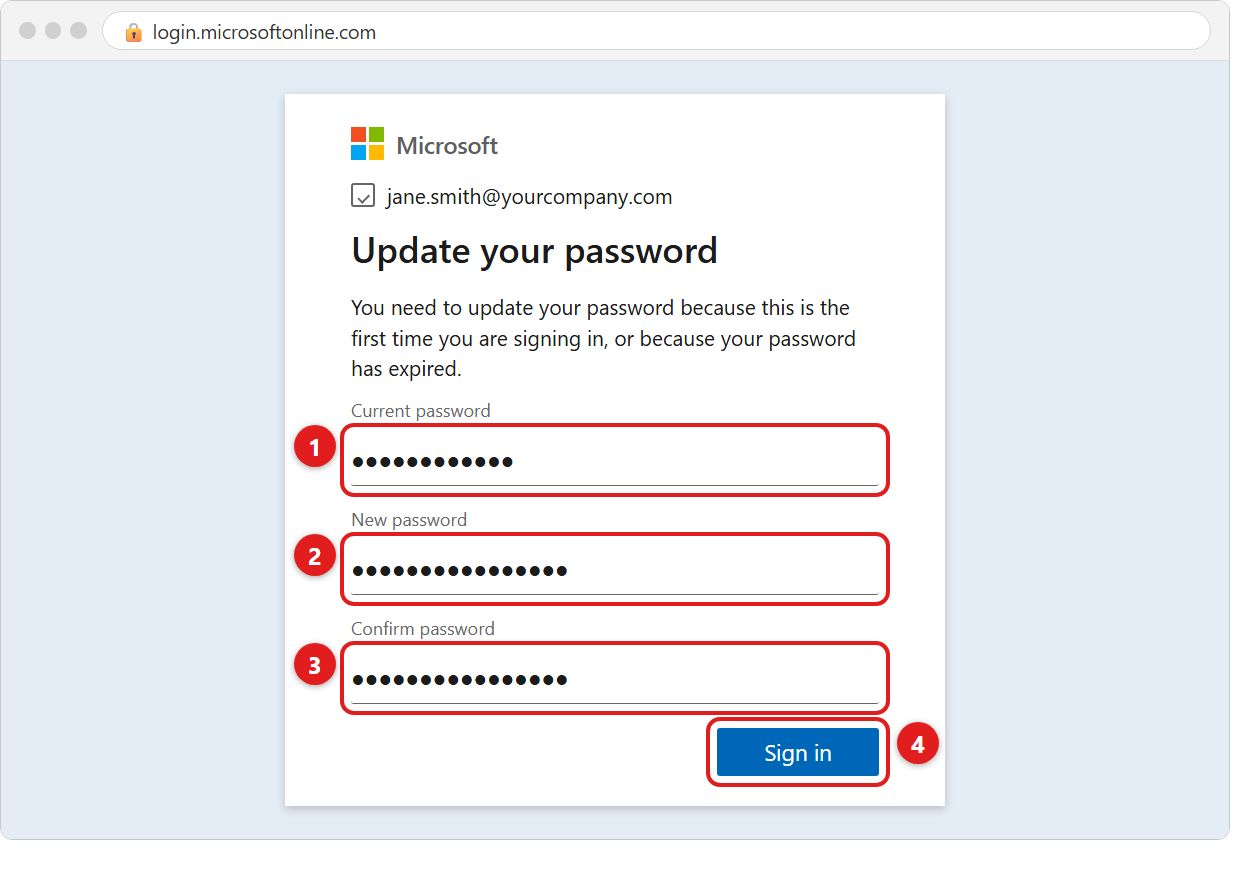
Step 4. Choose your own password. Because this is your first sign-in, Microsoft asks you to replace the temporary password with one that only you know:
- Current password — type the temporary password again.
- New password — type a new password that you make up.
- Confirm password — type the exact same new password a second time.
- Click Sign in.
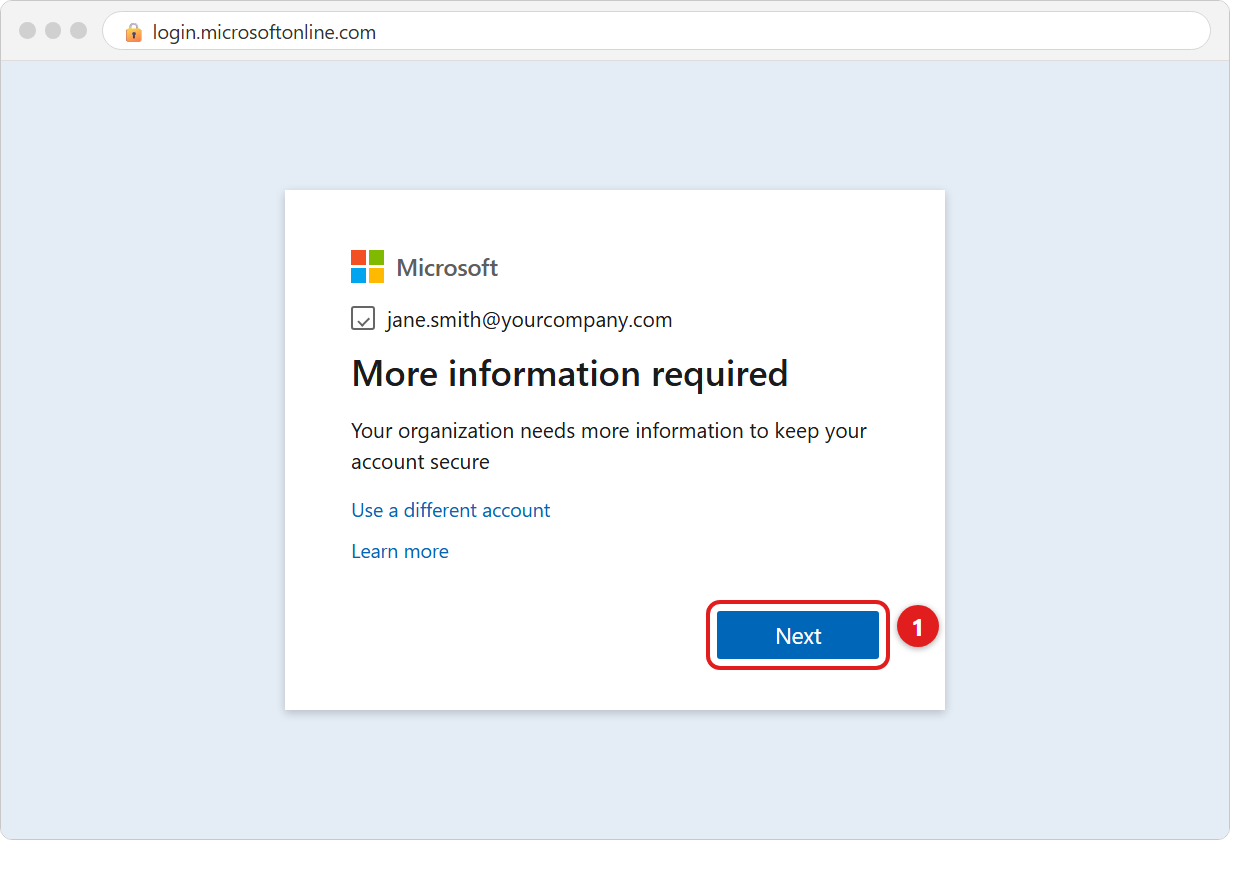
Step 5. Next you'll see More information required. This is expected. It's Microsoft asking to connect your phone. Click Next.
Part 3 — Connect Your Phone (Setting Up MFA)
Now the computer and the phone work together. Each step says which device to look at.
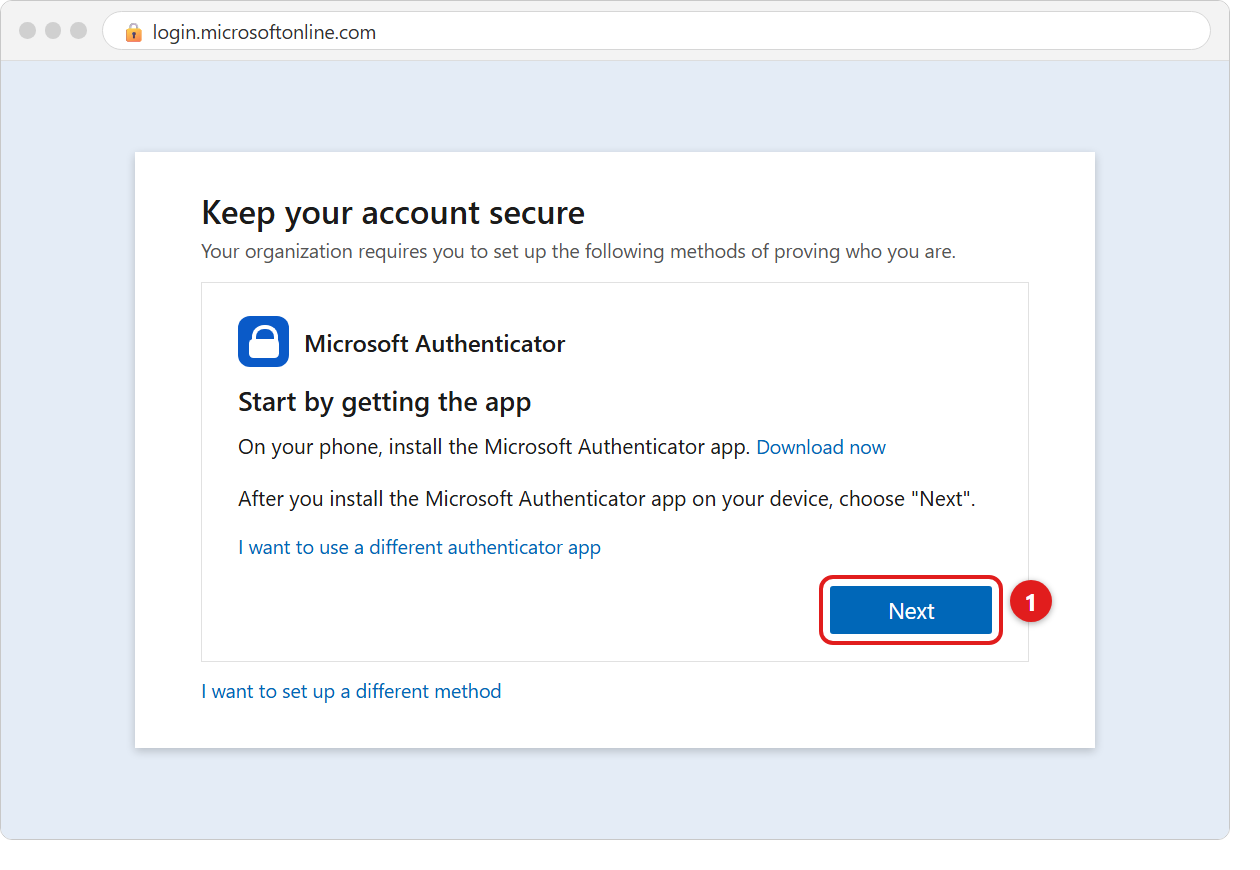
Step 1 — On the computer. The screen says Keep your account secure and Start by getting the app. You already installed the app in Part 1, so click Next.
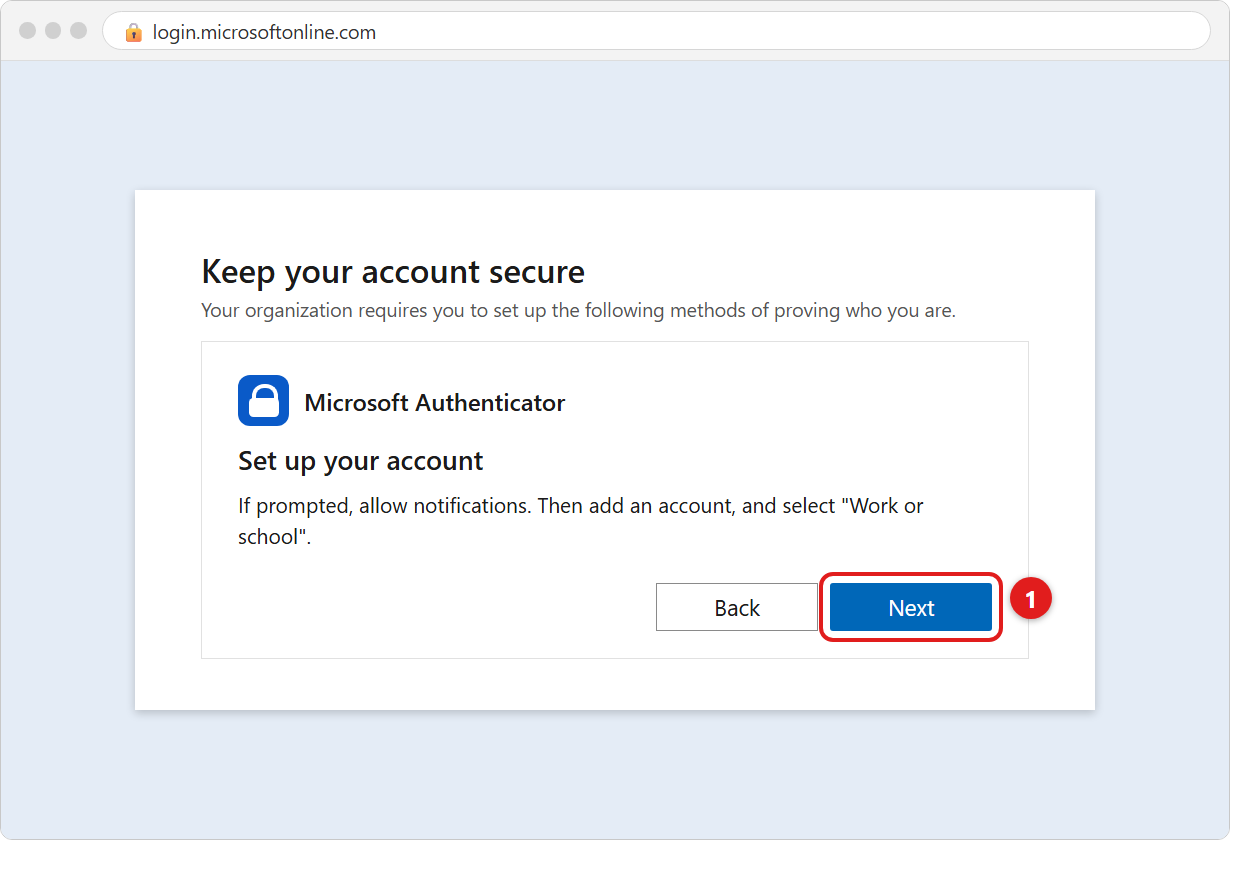
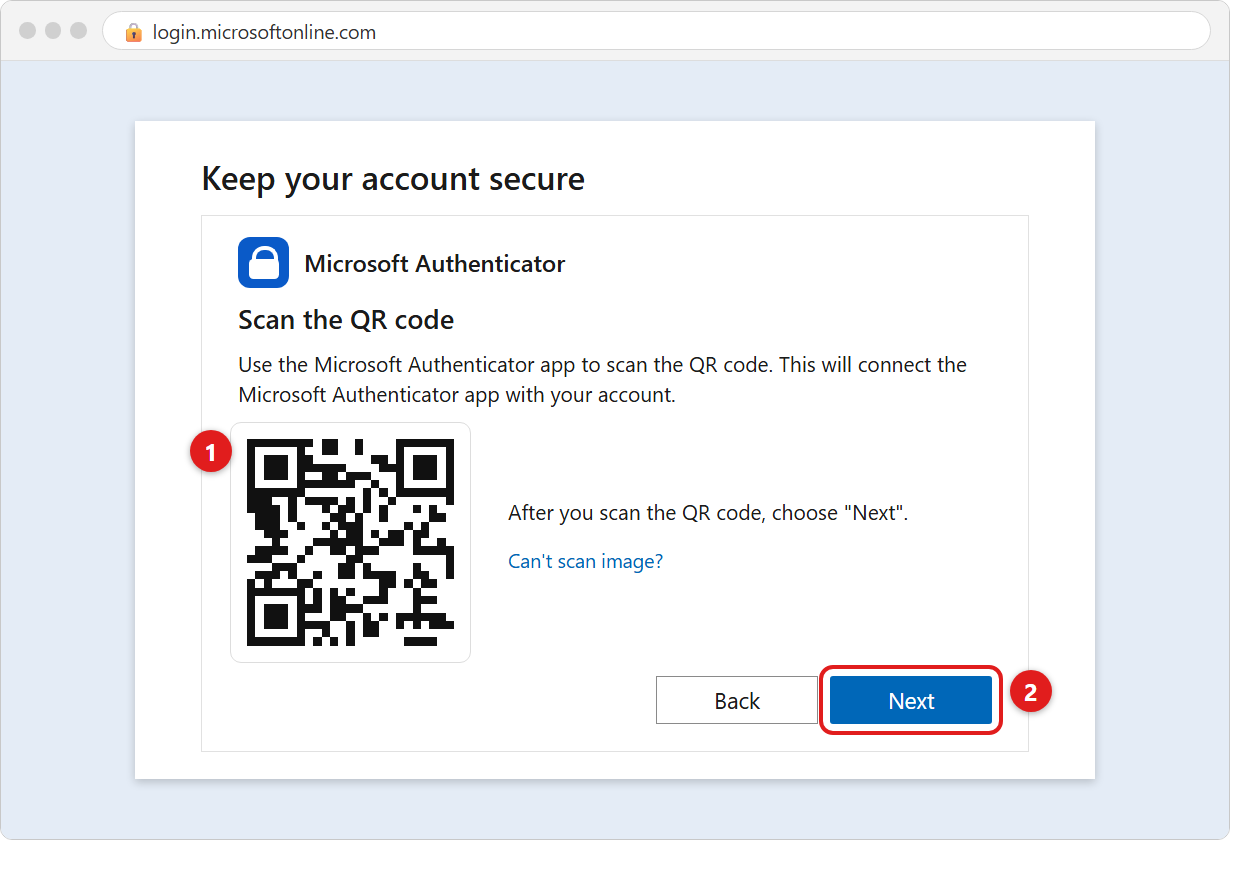
Step 2 — On the computer. The screen says Set up your account. Click Next. A square black-and-white pattern called a QR code appears. Leave it on the screen. You're about to scan it with your phone.
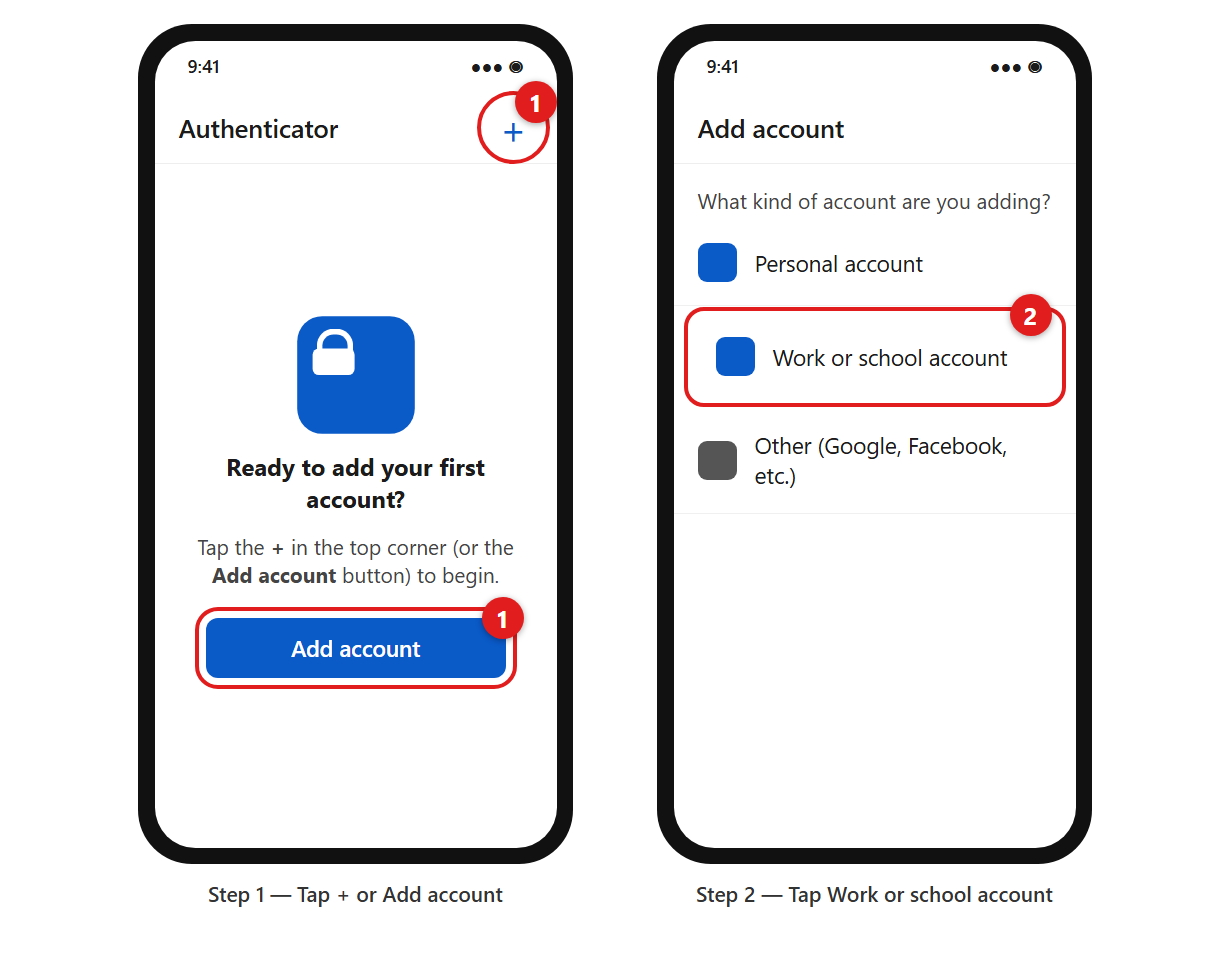
Step 3 — On your phone. Open the Microsoft Authenticator app. If it asks to send you notifications, tap Allow. This matters, because notifications are how your phone receives the "Is this you?" messages. Then:
- Tap the + in the top corner, or the Add account button.
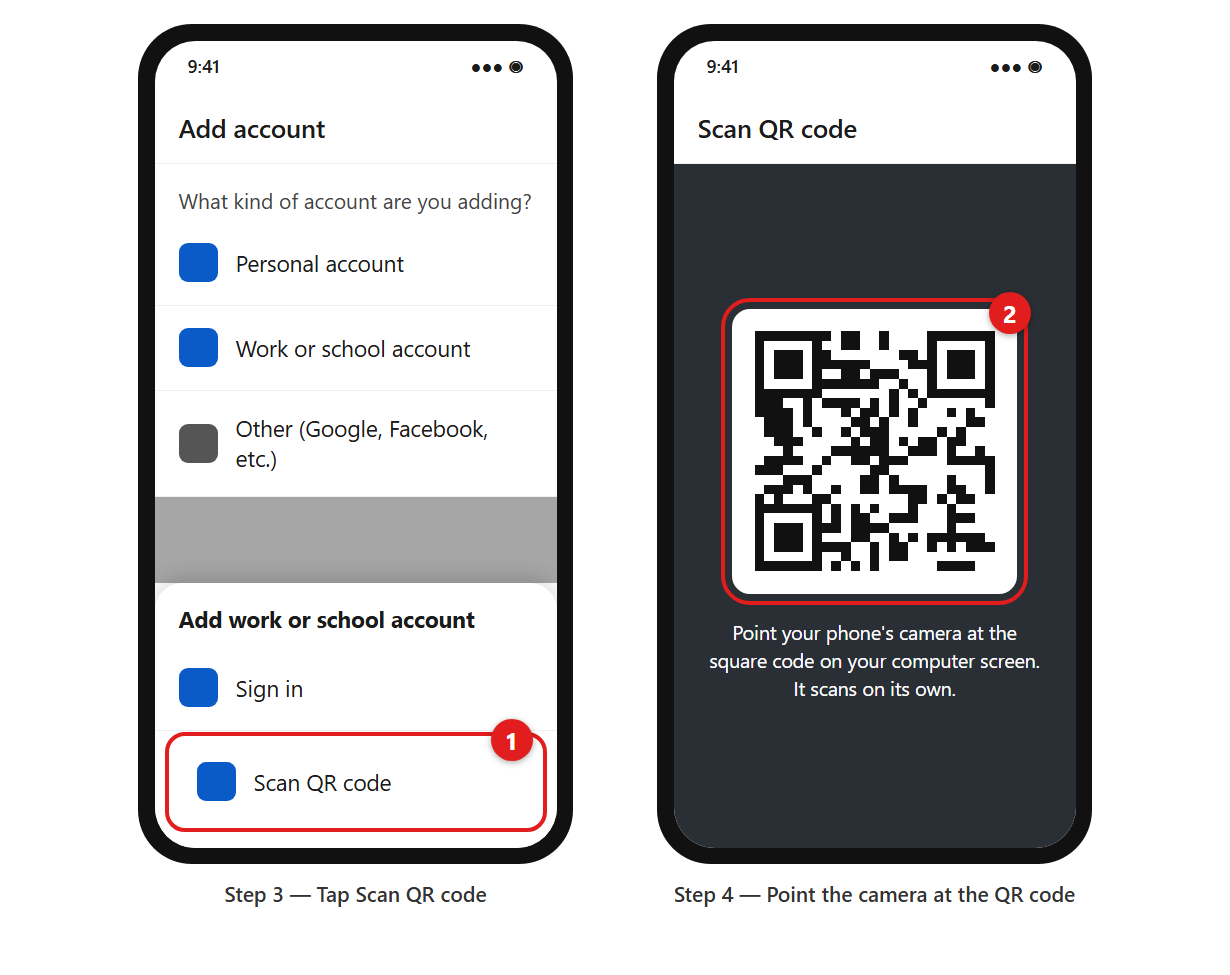
- Tap Work or school account.
Step 4 — On your phone. Tap Scan QR code. If the phone asks for permission to use the camera, tap Allow or OK. The camera opens.
Step 5 — On your phone. Hold the phone up so the camera can see the square code on the computer screen. Keep it steady, about 6 to 10 inches away. You don't need to press anything. It scans on its own, and your account appears in the app.
Step 6 — On the computer. Once the phone has scanned the code, click Next under the QR code.
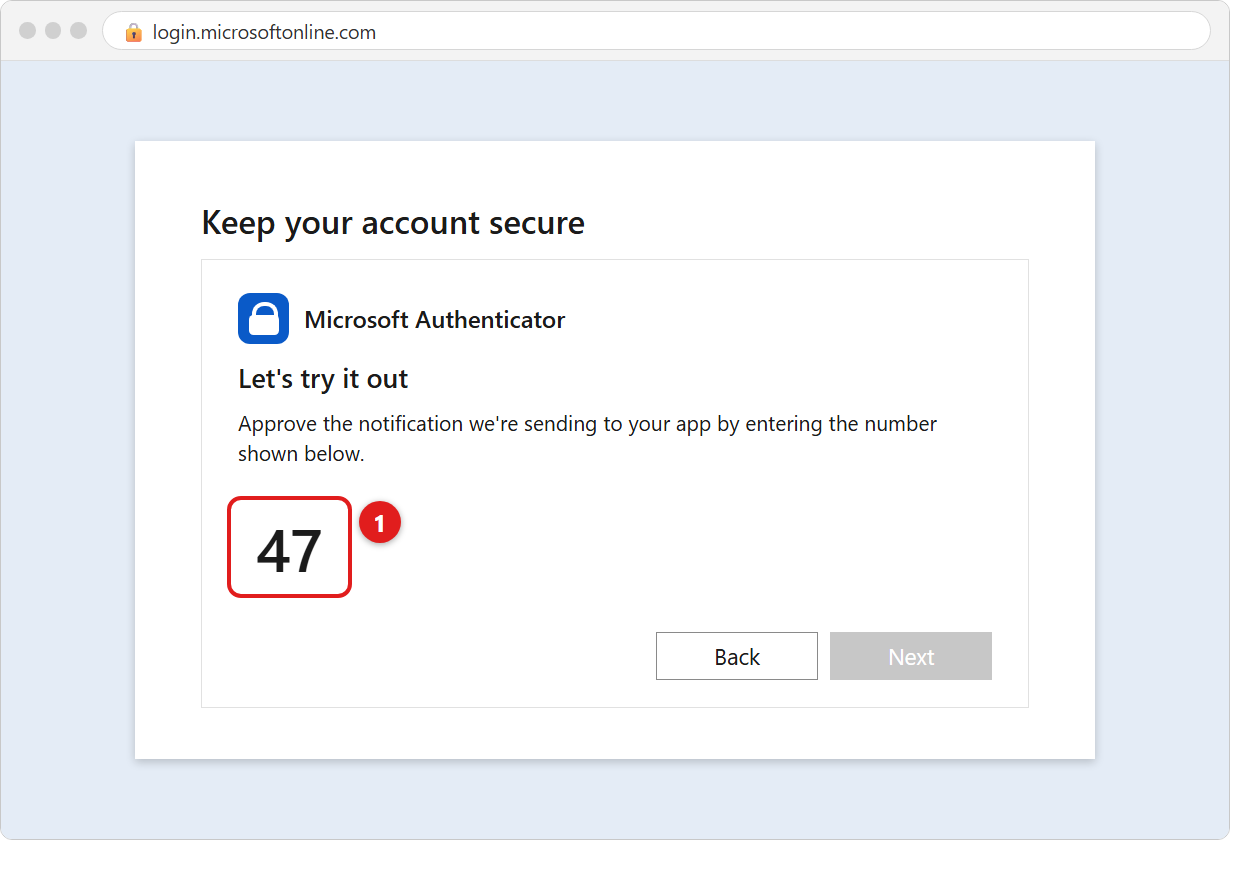
Step 7 — Test it. The computer shows Let's try it out with a two-digit number. At the same time, your phone receives a notification.
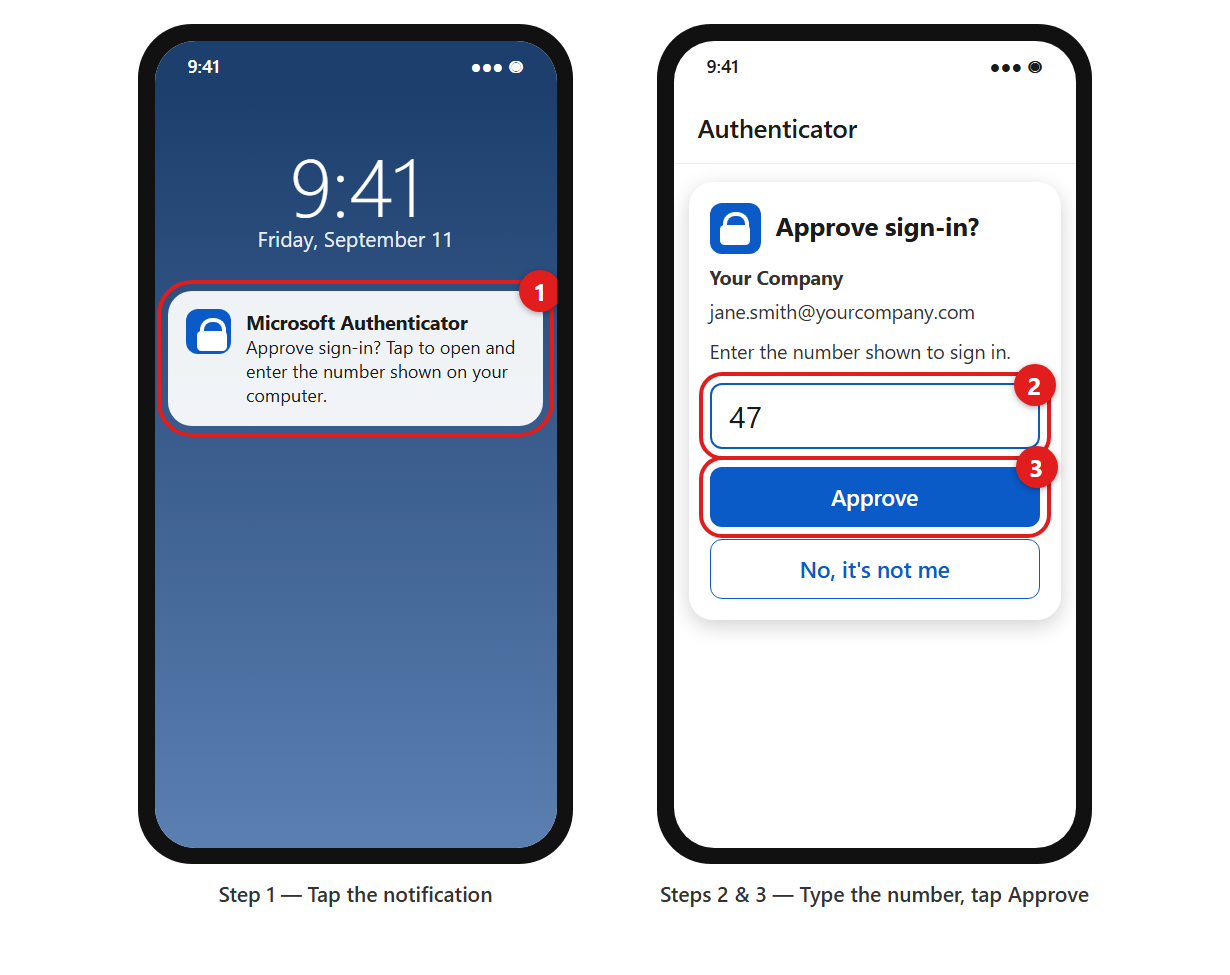
Step 8 — On your phone. Tap the notification, or open the Authenticator app. Type the number shown on the computer screen into the box and tap Approve.
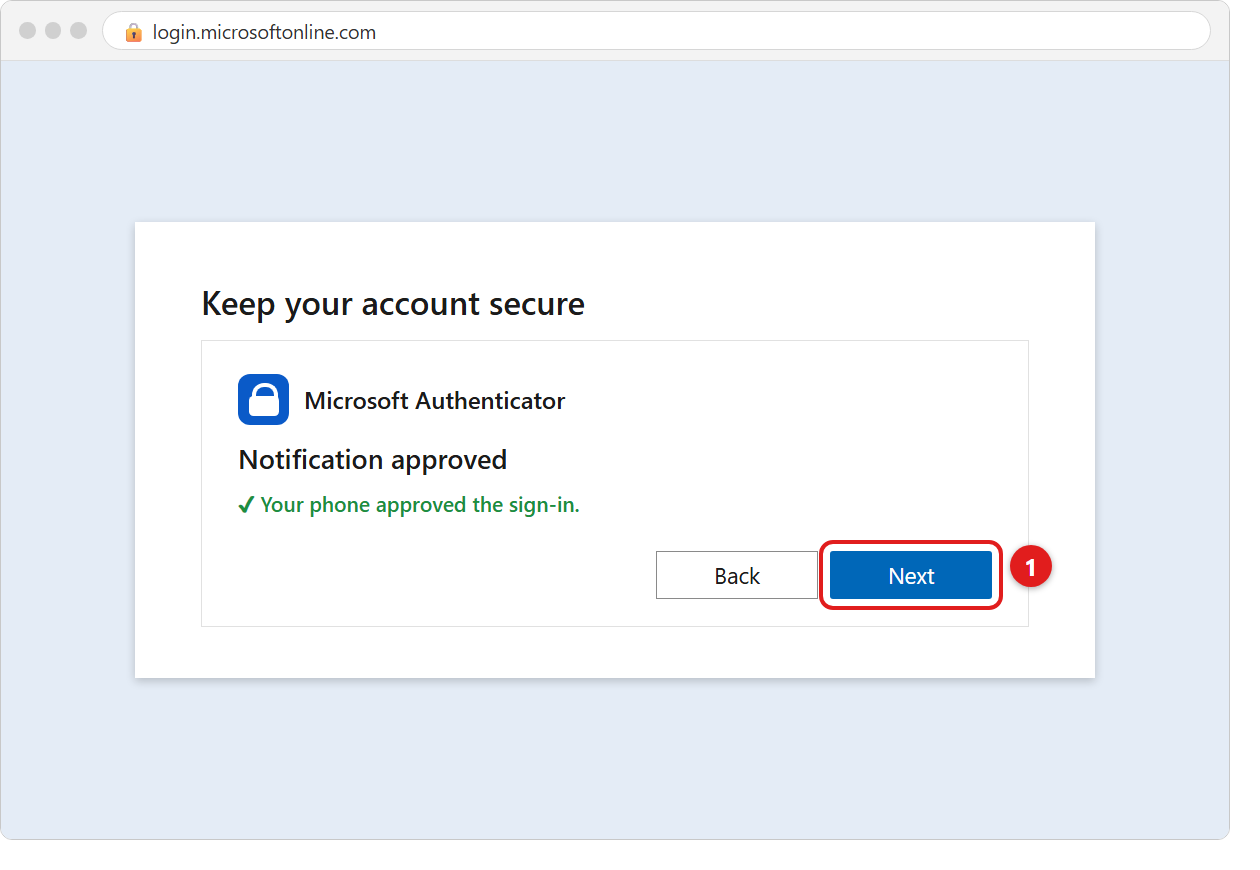
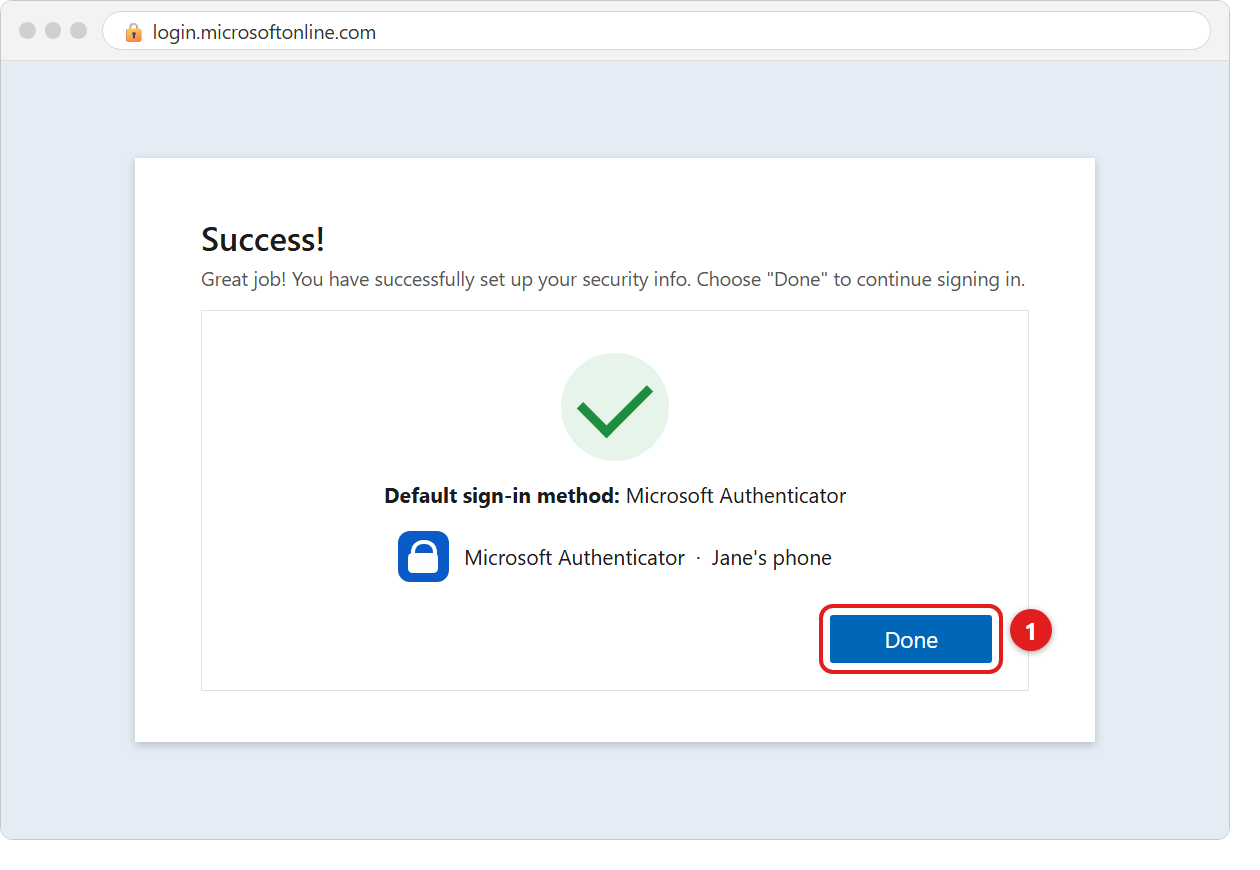
Step 9 — On the computer. The screen says Notification approved. Click Next. Then, on the Success! screen, click Done.
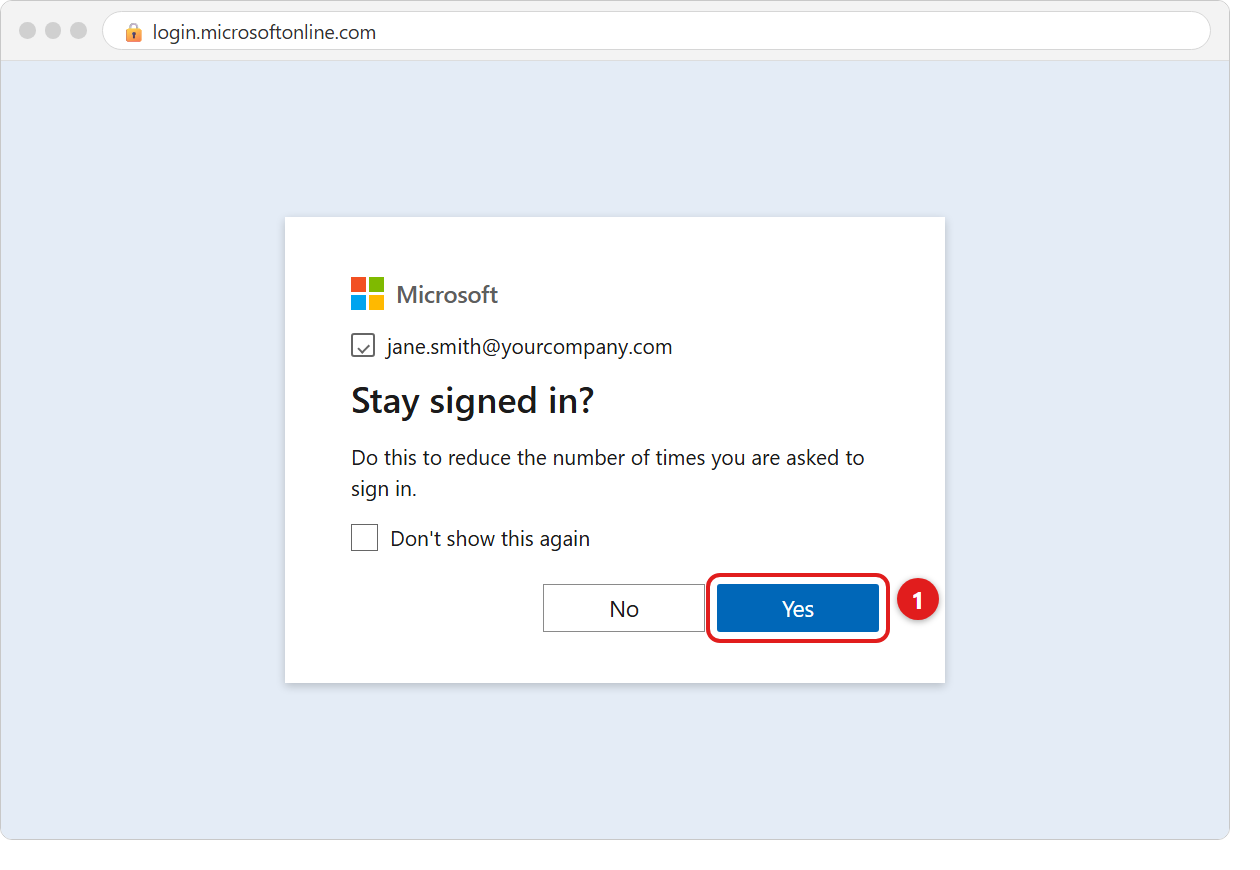
Step 10. If you see Stay signed in?, click Yes if this is your own work computer. Click No if it's a shared or public computer.
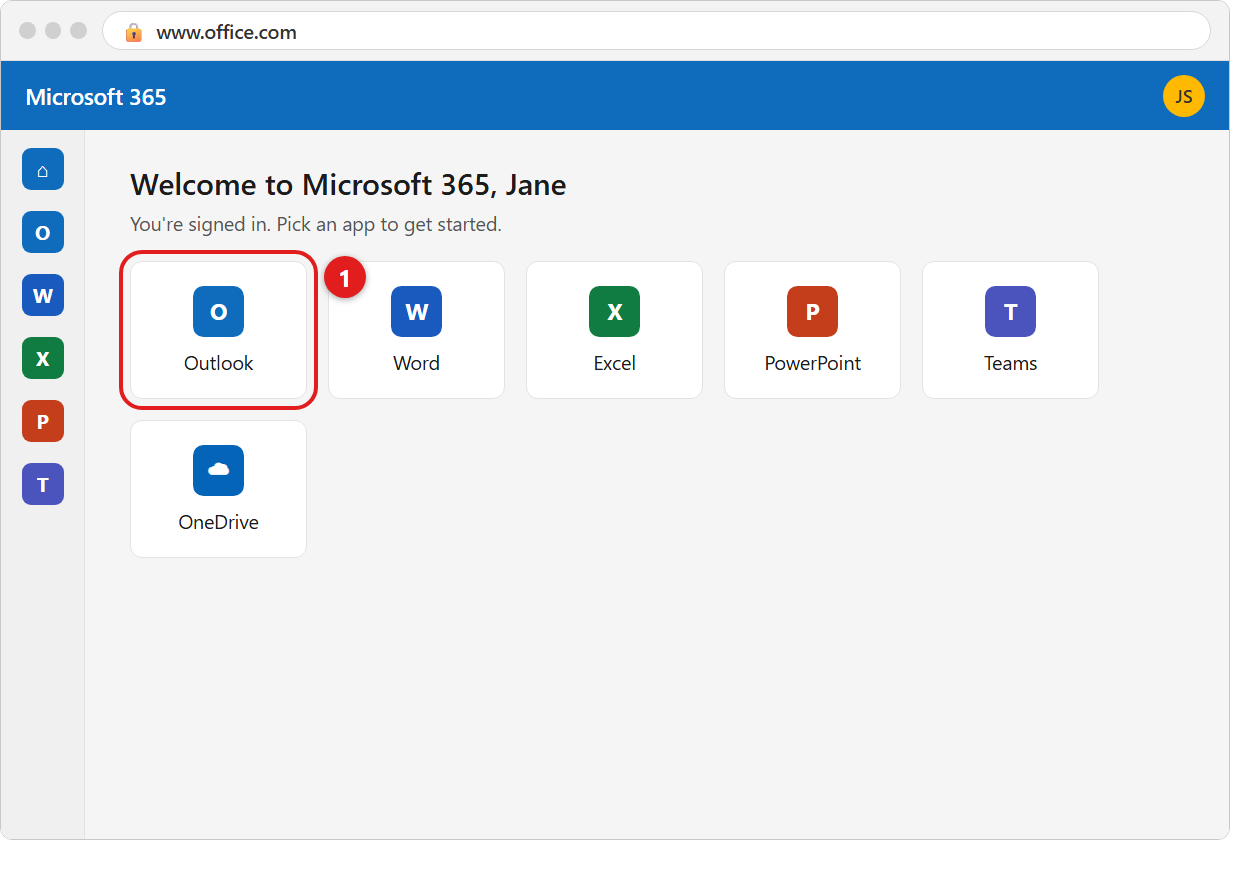
Step 11. You're in! Click Outlook to open your email.
What Happens Next Time You Sign In
- You'll type your email address and your new password, just like today.
- Your phone will buzz with an Approve sign-in? message showing a number box. Type the number shown on your computer screen and tap Approve.
- On your own computer you usually won't be asked again for a while. You'll see it more often when you sign in on a new device or after you change your password.
If Something Goes Wrong
- The temporary password doesn't work. Check Caps Lock and look-alike characters (see the tip in Part 2). If it still fails after three careful tries, stop and contact us. Too many wrong tries can lock the account, and we can reset it in minutes.
- The QR code won't scan. Make sure you tapped Scan QR code inside the Authenticator app, not the phone's regular camera app. Turn the computer's screen brightness up, and move the phone slowly closer or farther away.
- No notification arrives on the phone. Open the Authenticator app yourself. The request usually appears inside it. Also check that the phone has internet (Wi-Fi or mobile data) and that notifications were allowed for the app.
- You see a screen that doesn't match these pictures. Microsoft updates its screens from time to time, so wording can differ slightly. Look for the option that mentions Microsoft Authenticator and follow the prompts. If you get stuck, contact us. It's a quick fix.
- You get a new phone later. See Getting a new phone: moving Microsoft Authenticator before you get rid of the old one.
Related Guides
- Microsoft 365 - Outlook Client Setup — set up the Outlook program on your computer after you're signed in.
- Microsoft 365 Self-Service Password Reset — reset a forgotten password yourself, using the phone you just connected.
- Getting a new phone: moving Microsoft Authenticator
If you have any questions or run into any issues, please submit a support request.